Friday, September 13, 2013

Reena Roy's Rocky Road....RRRR

This is an Australian Favourite!

I learnt about it while living there. It did take me a while to like marshmallows in chocolate but once I got the hang of it...there was no turning back.

There are many variations available including ones made by Cadbury and many other superior chocolate makers.

None beats a homemade version where the variation varies from adding Turkish Delight, Raspberry lolls, Snickers bars, Rice Krispies etc.

This one is a simple and quick one. Great for kids birthday parties. Which kid does not like marshmallows, oreos and melted chocolate all put together???

Ingredients
110 silvered almonds
2/3 cup desiccated coconut
250g mini marshmallows, colored...(if you cant get mini, get the big ones and pull them apart)
115g oreos or chocolate sandwich cookies, broken into smaller pieces
500g good Belgian Eating Dark Chocolate, melted

Method

  1. Lightly grease rectangular pan (28cm x 18cm approximately), line with parchment paper.
  2. Preheat over to 180C / 350F. Spread almond on baking tray and bake for 3 to 5 minutes until lightly golden. Transfer to plate to cool.
  3. Meanwhile, place coconut in a pan and
    lightly roast over medium heat till golden brown. Transfer to plate to cool. Leaving it in the pan to cool is never a good idea. The heat continues to cook the coconut and make it darker.
  4. Combine almonds, coconut, marshmallows, cookies in a large bowl. 
  5. Place chocolate in a heatproof bowl over a saucepan of simmering water. (Double Boil!) Stir until the chocolate has melted.
  6. Pour melted chocolate over the marshmallows mixture. Using a wooden spoon or rubber spatula, mix all ingredients until evenly combined. Scrap marshmallow mixture into a prepared pan. 
  7. Place in fridge for 20 min to 40 mins to set. 
  8. Lift Rocky Road out of the pan and cut into 24 to 30 pieces depending on preferred size.
  9. Serve! 


Sunday, June 2, 2013

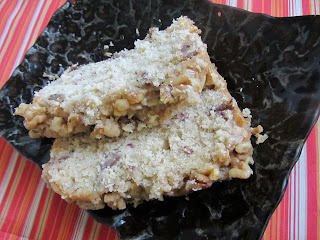
Walnut, Date and Honey Cake....tea time perfectness

This cake is oh so moist, light and it crumbles in your mouth with every bite.  So easy and quick to make. Perfect for that last minute tea party or visit to a friend's place.

Ingredients
225g / 8oz self-raising flour
1/2 tsp ground cinnamon
1 tbsp desiccated coconut
175g / 6oz butter, softened
100g / 3 1/2oz light brown sugar
3 tbsp clear honey
2 eggs, beaten
2 medium ripe bananas (about 250g / 9oz total weight with skins), peeled and mashed.
100g / 3 1/2oz stoned soft dates, chopped small or cut with kitchen scissors
50g walnut pieces

Method

  1. Pre heat oven to 160C / 325F. Line the base of a 1kg loaf pan with parchment paper. Butter the tin and the parchment paper to ensure the cake comes out easily. 
  2. In a large mixing bowl, add the flour, cinnamon, desiccated coconut, butter, brown sugar 2 tablespoons honey, eggs, mashed bananas and dates. Mix for 2 to 3 minutes with a beater or with a wooden spoon. Mix until smooth.
  3. Spoon the mixture into the prepared tin. Scatter the walnut pieces over the top. Bake for 1 hour. Once baked, lightly press the top - it should feel firm. If not bake for another 10 minutes. You can also use the toothpick test. 
  4. Cook for 15 minutes, lift out of the tin with the parchment paper. When cold drizzle the remaining honey over the top. Cut into thick slices to serve. 
Tip : for a special taste, use a honey that is rich in flavour....Greek, Australian or Mexican honey would be a good choice!


Tuesday, May 14, 2013

Dark Bottom Choc & Cream Cheese Cuppies


This recipe is tried and tested so many times and has never failed me. One of my best friends from high school (we are a crazy bunch of 4) Carmen Lee runs a cake business in Laos. She is so talented and has hands worth kissing. Unfortunately she does not have a blog for me to share the pictures of her cakes with you but please trust me when I say they are gorgeous, creative and they look soooo good, you almost don't want to cut or eat them. This recipe is courtesy Carmen and I do not lie when I say that every time I bake them, they don't stay on my table very long.

The good thing about this cupcake is that you can make it without the cream cheese part and it will still taste yum. Just make sure you fill 3/4 of the cupcake liner if you are not including the cream cheese.


When you make it the batter will not be as thick as a regular batter, but it cooks up just fine, so don't worry if it seems a little runny.

Ingredients
Choc Cake:
3 cups all-purpose flour 
2 cups white sugar 
1/2 cup unsweetened cocoa powder
1 teaspoon salt
2 teaspoons baking soda
2/3 cup vegetable oil 
2 cups water
2 tablespoons vinegar 
2 teaspoons vanilla extract 

Filling:
1 (8oz) package cream cheese softened 
1 egg 
1/2 cup white sugar 
1/4 teaspoon salt
1 cup mini semisweet chocolate chips 

Method
  1. Mix together flour, sugar, cocoa, salt and baking soda in a large mixing bowl. (dry ingredients)
  2. In a separate bowl, mix oil, water, vinegar and vanilla until well blended. (wet ingredients)
  3. Make a well in the middle of the dry ingredients & stir in the wet ingredients until nice & smooth. You can use a strong wooden spoon to do this. No electric mixer required. 
  4. Pour batter into lined cupcake trays half full. Pouring is always the messy part. I normally pour the batter into a small jug with a spout so it makes it easy to pour it. I use a spoon to control the amount that falls into each cupcake liner.
  5. Beat cream cheese until smooth with electric beater.
  6. Add egg, 1/2 cup sugar and 1/4 teaspoon salt until light and fluffy. 
  7. Stir in chocolate chips. Drop a heaping teaspoon of the cream cheese mixture into each cupcake. Use the back of your spoon and spread it a little.  
  8. Bake for 22 minutes if you are using a muffin pan as the bottom browns quickly. Bake 25-30 minutes at 350F (175C). Poke only the chocolate side of the cupcake to test if it is cooked as the cream cheese will remain soft. 
  9. REMEMBER CHOC CHIPS MELT TOO!

Makes approximately 42 x 2inch cupcakes / 24 x 2.5 inch cupcakes


You can top these with buttercream or cream cheese frosting. 

Tuesday, April 23, 2013

Chocolate Mud Cake.... with satin chocolate glaze


Had another birthday and another reason to make a cake!

This cake was dense and moist. Very rich in flavour and essentially is also depends on the type of dark chocolate you use. I used 80% cocoa Columbian dark chocolate and all those who ate it loved the density and richness of the chocolate taste.

Ingredients

250g butter, chopped
200g dark eating chocolate, chopped
2 cups caster sugar
1 1/3 cups warer
1 tablespoon dry instant coffee (for the mocha touch)
3/4 cup plain flour
3/4 cup self raising flour
1/4 cup cocoa powder (I used premium belgian dark chocolate)
3 eggs, beaten lightly

For satin glaze :
200g dark eating chocolate, chopped
2/3 cup thickened cream or heavy cream

Method

  1. Grease and line deep 19cm square cake pan.
  2. Combine butter, dark chocolate, sugar, water and coffee in a saucepan, stir over low heat without boiling until butter is just melted and mixture is smooth. Transfer to large mixing bowl and allow to cool for at least 10 minutes.
  3. Preheat oven to 300F.
  4. Combine sifted flours and cocoa powder. 
  5. Whisk in (keep adding the flours  mixture) into the chocolate mixture. Add in the eggs bit by bit while beating until batter is smooth. Pour into prepared pan.
  6. Bake for 1 3/4 hours. Once done, cover cake with foil and allow to cake to cool in the pan. This step will allow the moisture to stay in the cake.
  7. Make the satin glaze. Combine chocolate and cream in a heatproof bowl and melt using double boiler method. Stir until smooth. Double boiling is when you heat water in a pan and put the bowl with the chocolate in the pan. The heat from the simmering water will melt the chocolate.
  8. Spread a thin layer of the warm glaze over cold cake. Allow the glaze to stand at room temperature until it thickens slightly. Then spread over the top and sides of the cake. Sprinkle top with decorations if desired. 
(sorry for the lack of pictures....this was very last minute)

Thursday, April 18, 2013

Sun-dried Tomato & Olive Muffins


A couple of years ago when we were travelling around New Zealand, we stopped at a cafe at Auckland's Botanical Gardens. I tried these amazing savory muffins and decided that 1 day I will get down to making these at home. I don't remember all the ingredients in that muffin but I do remember that it had onions, green peppers, Kalamata olives, zucchini and sun-dried tomatoes. I am still yet to attempt this recipe!  For now, I made the simple version.

Today I had a craving to eat sun-dried tomatoes but not in a sandwich. So I looked up a muffin recipe and found one on the Betty Crocker website. I made a few variations to suit my taste and based on the ingredients I had. The came out oh-so-divine with a lovely balance of saltiness from the olives and the supreme taste of sun-dried tomatoes. I will experiment to make this is a loaf pan next time. It has the same consistency of soft bread and would definitely make a great accompaniment to a sunday big breakfast!

WARNING : if you don't like sun-dried tomatoes, DO NOT TRY THIS AT HOME!!

Ingredients

1 cup milk
1/4 cup olive oil
1 large egg
2 cups all purpose flour
1/4 cup grated cheddar cheese (you can use parmesan or even crumbed soft feta)
1 tsp mixed italian dried herbs
2 1/2 tsp baking powder
1/4 tsp salt
1/4 tsp mexican chili powder (you can use cracked black pepper as an option)
1/2 cup sun-dried tomatoes in olive oil, drained & chopped
1/4 cup pimento stuffed olives or Kalamata olives

Method

  1. Heat oven to 400F / 205C and line 12 cup muffin tray.
  2. Beat milk, oil and egg together until mixed up. Mix in flour, cheese, herbs, baking powder, salt and chili powder. You can beat on low speed or mix it using a wooden spoon. 
  3. Fold in sun-dried tomatoes and olives. Divide equally into 12 muffin cups.
  4. Bake for 20 to 23 minutes until golden brown. 
  5. Turn onto wire rack to cool. Serve warm. Can be warmed in the microwave for 10 seconds. 
  6. Can be served with cream cheese or honey. 


Thursday, March 28, 2013

Eggplant Parmigiana

Eggplant is a vegetable with several varieties, shapes and most widely known as Aubergine, Eggplant, Brinjal. The beauty is that this vegetable is used all over the world across varied cuisines. 

My memory of eggplant as a child is definitely "Sambal Terung" which is a eggplant cooked in a spicy chili paste and just fried eggplant seasoned with salt and chili powder. The fried eggplant would often be a condiment to Dhall (indian lentil dish) or a spinach stew called "Sai Bhaji" that is a dish that most Sindhi's cook. Now you ask Sindhis?? That is my ethnic origin native to the Sindh province of Pakistan (then India). 

Back to eggplants! As I travelled, I got introduced to more varieties and my favourites are the Greek Moussaka, Italian Melanzane alla Parmigiana, Middle Eastern Baba Ghanoush, Indian Baingan ka Bhartha, South Indian Eggplant Sambar and of course grilled strips of Aubergine seasoned lightly with olive oil and italian herbs make a great side salad. 


Ingredients
4 long medium sized eggplants
1 1/2 cups milk
2 cups breadcrumbs 
5 tsp mixed Italian 
oil for lightly coating tray

Tomato sauce ingredients:
4 tbsp olive oil
8 cloves garlic, chopped
1 medium onion, chopped
8oz / 227g fresh mushrooms, chopped
16oz / 453g can of chopped tomatoes
3 tbsp tomato paste
5 tbsp mixed Italian herbs
salt and pepper to taste

5oz / 141g Mozzarella Cheese, grated
5oz / 141g Medium cheddar cheese, grated
3oz / 85g Parmesan cheese


Method
  1. Preheat the oven to 375F / 190C.
  2. Line a pan and lightly oil the baking sheet.
  3. Slice the eggplants in 1/2 inch thickness. If you have the long eggplants, slice them long. If you have the round plump eggplants, slice them round.
  4. Create an assembly line. Dip the sliced eggplants in the milk and then coat with breadcrumbs. if your breadcrumbs don't stick, press them down. Arrange the eggplants on the tray and bake for 25 minutes. 
  5. Put 3 tbsp olive oil in a pan, add in the garlic, onions and mushrooms. Sauté for 5 minutes.
  6. Add in the chopped tomatoes, tomato paste, herbs and salt and pepper and allow to simmer for 15 minutes stirring occasionally. 
  7. Assembling : Spread a layer of half the tomato sauce on the base of a 2" high bake proof dish. You can use a square, oval or round dish.
  8. Arrange half the baked eggplants of top of the tomato sauce to completely cover it. Sprinkle half the Mozzarella, Cheddar and Parmesan.
  9. Repeat the layering starting with tomato sauce, eggplants and cheese. Be gentle to ensure you don't mess up the first layer. 
  10. Covered with cheese before baking
  11. Bake in the over at 375F / 190C for 35 minutes or until the cheese has melted and is starting to brown. Slice and serve. A fresh salad would go beautifully with this! French fries would be the less healthy side option that go well with this!
Serves 6 to 8.

Tuesday, March 26, 2013

Mango Mania Triple Sampler (Mango Mousse, Mango Coconut Sorbet & Mango Brûlée)


Its MANGO MANIA for me all last week. I got my hands on some super sweet Mangoes from Mexico and after reading this article on "Health Benefits on Mangoes" I had more the reason to buy them.

What I love about this sampler platter is that all the recipe's take less than 30 minutes to make (excluding freezing and refrigeration time).

When I finally plated my platter and having eaten them all together, I do think that I could have broken the Mango flavour with some cream on the side. Having said that, I enjoyed the rich flavours of each dessert. I didnt want the palate to be clouded with the taste of cream. I can tell you that the cold of the sorbet plus the warmth of the brulee and the smoothness of the mousse was a perfect way to end the meal! 

First I must share the secret of making a good sorbet.

  • Taste, taste, taste.... taste as you blend. Be careful not to be too generous with the sugar or sweetener.  The sweetness of a sorbet is enhanced when frozen. So if your sorbet taste just right before you freeze it, it will be probably too sweet when you serve it. So dont go "sugar happy"!
  • Alcohol.... this is optional but adds so much more flavor to the sorbet. Since alcohol does not freeze, it also gives the sorbet a grainy feel rather than a super smooth texture. 
  • To make any sorbet, you need 3 main ingredients.
    • Any fruit of your choice - watermelons, berries, mango, peaches, lychees etc
    • Acidity - lemon juice, lime juice, orange juice, balsamic vinegar are the popular options
    • Sweetener - simple sugar syrup, agave nectar & honey are natural and more healthy options of course, sweet wine, fruit juice etc.
  • Be creative!!!
    • Watermelon or Raspberries & Vodka
    • Figs & Balsamic vinegar
    • Lemon & Mint
    • Strawberry & Basil
Mango & Coconut Sorbet
2 medium sized mangoes, chopped
1 lime, juiced
12 oz / 350ml unsweetened coconut milk (light)
1/4 cup honey
1 tsp vanilla essence
2 tsp coconut rum (optional)

  1. Put all ingredients into a food processor or blender and blend. Puree the mixture through a sieve to ensure you get a nice smooth mixture with no particles. 
  2. If you have an ice cream maker, follow steps based on your machine recommendations to make sorbet. If not follow steps 3 & 4.
  3. Pour into a freeze proof container and freeze. 
  4. Once frozen (or almost frozen), break into pieces and blend again. Return to container and freeze again. Repeat this step again for a ultra smooth consistency. Remember that sorbets are meant to be soft like a frozen yogurt. 
  5. Can be made 3 days in advance before serving. Ensure that the container is an air tight container. 


Mango Mousse 
1 packet Mango jelly
2 medium sized mangoes, chopped
1 cup cream
5 basil leaves


  1. Make the mango jelly as per packet instructions but only make 3/4 recipe. So if the recipe calls for 2 cups water, use only 1 1/2 cups water with all the contents of the jelly packet. Add the basil leaves while the water is boiling before adding the contents of the packet. Allow to cool.
  2. Once the mango jelly mixture is cool, remove the basil leaves and put mixture in the food processor with mangoes and cream. 
  3. Blend until smooth. 
  4. Pour into individual serving cups or large container. Refrigerate until set. 
  5. Should be made 1 day in advance before serving. 

Mango Brûlée 
2 medium sized mangoes
4 tbsp brown sugar
1 lime, cut into 4 wedges

  1. Slice the cheeks of the mangoes on both sides leaving the stone. Slice as much flesh as you can getting close to the stone. 
  2. Leaving the skin on, gently run your knife scoring crisscross pattern about 2cm through the flesh stopping at the skin. Be careful not the cut through the skin. 
  3. Turn the skin inside out a little. Spread 1 tbsp of brown sugar per half.
  4. Turn on your broiler on high, place the mangoes on a baking tray lined with foil.
  5. Broil for 5 minutes of till sugar turns brown and crystalizes a little. 
  6. Squeeze the juice of 1 lime wedge and serve warm!

Assembling the platter
  1. Serve the sorbet into a small bowl and place on platter. Garnish with mint leaves or small coconut pieces
  2. Place the Mango Brûlée on the platter while still warm.
  3. Place the individually set Mango Mousse bowl on the same platter.


Serve quickly and see how it disappears as quickly as your served it!